NPC Note Card database - Tutorial
Want to have a simple, yet potentially very extensible NPC database? This tutorial will show you how to use Google Sheets and Google Forms to make one, accessible from any device that can handle Google Drive.

Last year, I made mention of a NPC database that I wrote in Microsoft Access that would allow me to not only track the various NPCs, but also automate the generation of "events" that would affect the NPCs.
 This approach to tracking NPCs was inspired by Tony Bath's Hyborea campaign and his book "Setting Up a Wargames Campaign". Tony recommended the use of index cards (this was written in the 1960s!) for tracking NPCs ("generals and personas") in the campaign. This was the method that Professor M.A.R. Barker used in his Tekumel campaign in the 1970s. According to Jeff Berry/Chirine Ba Kal, Barker had over 1,200 notecards of NPCs!
I've tried Obsidian Portal's NPC/Character tool. I tried using a homebrew Microsoft Access database solution. But neither really met my needs for something that was simple as a Rolodex of note cards.
Enter Google - specifically, using Google Sheets and Google Forms. It's not a perfect solution, but given that I use Google Docs extensively already for my campaign, it fits into the flow. And it is simple like the note cards!
This tutorial is going to show you how I did this - maybe you'll like it! It's pretty simple to set up, and aside from a couple of restrictions, I see a lot of possibilities! I hope you'll try it out and let me know what you think.
1. Go to Google Drive and create a spreadsheet (Google Sheet).
(If you don't have a Google Drive account, it's pretty easy to set up.)
2. With the spreadsheet open, rename it to what you want to call your file. I called mine "NPC/PC Card File".
3. Now click on the Tools menu and choose the "Create a Form" option. A new tab will pop up in your browser with a Form created that has the same title.

4. Now you're going to create your card file fields. I wanted to keep this simple, so for now, I'm creating three fields - Name, Location and Notes. I want Notes to give me lots of room for free form text, but the other fields don't have to be too large.
5. For your first field, change the title to "Name" and the type to "Short Answer".

6. For the second field, click the "+" to the right of the form. In the new question, change the title to "Location" and the type to "Short Answer".
7. For the third field, click the "+" again. This question's title is "Notes" and the type is "Paragraph". This allows you to type in a lot more information.
NOTE: Before you close this form editor tab, see the URL in the browser address bar? Go ahead and select that and copy it somewhere, maybe to a Notepad or a document somewhere. You're going to need this URL in a minute.
8. Close the Edit Form tab and switch back to the spreadsheet. You will see that a new tab has been added to your spreadsheet, called "Form Responses 1". Go ahead and click on that tab and you'll see three columns named after the form fields you've created, plus a column called "Timestamp".
9. To test this out, refresh the page. Click the Form menu and select "Go to live form." A new tab will open with the form you just created! You'll be able to fill out your note card and submit it.

10. Go ahead and do so, then come back to the spreadsheet. If the entries aren't already there, they will appear in a few minutes as Google updates the response. Viola! You have created and tested your new card file.

Now this is pretty cool, but there are some immediate limitations. How can you go back and update existing cards? Can you modify the form to add additional fields, if you want? Can you modify the order of things, both on the form and spreadsheet? How can you use the data?
So I'll cover a couple of these right now. And another blog post to cover how to use the data.
You can go back and update existing cards... but it requires a bit of additional work to set that up. It's not quite as easy as just updating the spreadsheet itself.
Google allows people to go back and edit/update form responses, but they don't make it easy. You can't just modify the data in the spreadsheet. For whatever reason, Google has the responses stored elsewhere and uses that as the source of truth, even though you can see the responses in the sheet.
To do this in a simple way, we have to use some scripting that will automatically add a link to each row that allows you to click it and come back to the form to update the note card!
If you are familiar with programming, this will not be too difficult. If you are completely unfamiliar with coding, you can copy and paste all this and follow step-by-step to get you to where you need to be.
11. Insert a column between the Timestamp and Name columns. Title it "Update".
12. Click on the Tools menu and select "Script Editor". A new tab will open in your browser to a screen that looks like what you see in step 13.

13. On the right side is the editor area.

There's some code already there. Select all of that and delete it. Then copy what is below and paste it into the editor area.
https://docs.google.com/forms/d/9abcb8NrHyezqnZ0q4IYfrGKo3KGn5vc_3b5FA3KDZxI/edit
The part of the URL in my example that is bolded/italicized is a form ID. It's between the slashes. You have to copy that form ID and in the code you just pasted, line #1, there's some text that says FORMID - replace that bit with the form ID.
So you go from this:
var formURL = 'https://docs.google.com/forms/d/FORMID/viewform';
To this:
var formURL = 'https://docs.google.com/forms/d/9abcb8NrHyezqnZ0q4IYfrGKo3KGn5vc_3b5FA3KDZxI/viewform';
(or whatever your form ID is... it's going to be different).
14. Click the File menu and choose the "Save" option. You will be asked to give a name to the project. I called mine by the same name as the spreadsheet/form: "NPC/PC Card File". Click the OK button with the new name and now the code is saved.
15. Now this next bit is a pain the rear. What we need to do now is to set up the function so that it can be used by the form and spreadsheet.
These next steps are what I had to do using Chrome as my browser. I don't know if you'll get the exact same thing in another browser, but hopefully something similar.
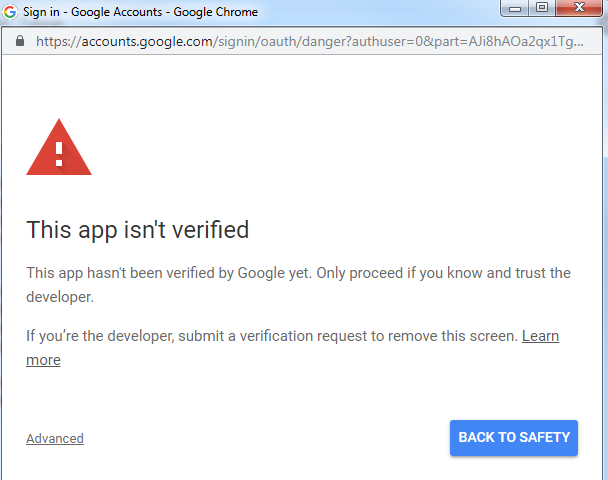
a. Click the Run menu, select the "Run Function" option and select "getEditResponseUrls". You should see a message pop up with something like below.

b. Now comes the weird part. Click "Review Permissions". A new browser window will open up and ask you to sign into your Google account.
c. Once you do, you'll get this big ugly message! Google tries to help people with security and warns them when they're doing risky things. Because you're probably not a verified developer through Google's services, you'll see this. But don't worry, we can continue!

d. Click the "Advanced" link. The warning window will expand a bit (you might have to scroll down). Now, click the "Go to NPC/PC Card File (unsafe)."
e. You will see a permissions window letting you know that this script will edit your spreadsheet (which we want, so we can can edit the data) and it will view/manage your form (which we want so we can show the form.). Click "Allow".

f. The window will close. You might see some quick updates as the function runs.. but nothing happens. That's OK! We're almost done!
16. We have to make it so that this script runs when you submit the form. To do that, we have to create a "trigger".
a. From the script tab, click the Edit menu and select the "Current Project's Triggers" option. A new tab will open up.

b. This new tab has a lot in it, but what you want to do is click the "create a new trigger" link or the "Add Trigger" button.

c. A form will pop up. Select "getEditResponseUrls" for function. Select "On form submit" for event type. The other fields should say "Head" and "From Spreadsheet". If not, make sure your form looks like below. Click "Save". It may take a few minutes, but you'll come back to the triggers tab and you'll see your new trigger.

17. OK, we are done with all the hard stuff! You can close the triggers tab and script tab. Go back to the spreadsheet. Click the Form menu and select "Edit form". A new tab will open with the form in it.
18. To the right on the form tab is a gear. Click it and you should see the Settings. Check the "Edit after submit" option and click save.

19. Now let's test this out! On the spreadsheet tab, click the Form menu and select "Go to live form" option. On the form, enter a new NPC and submit it. When you click back to the spreadsheet tab, you should see the following:
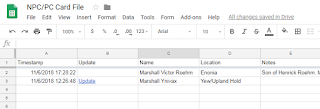
20. You should see the underlined "Update" link, click it - and you'll be able to go back and edit that NPC's card.
OK, now you have something useful! You can create and edit NPC cards. Just by using this spreadsheet and the attached form.
To add a new NPC record - just click Form/Go to live form menu, from the spreadsheet.
To edit an existing NPC record - just click the "Update" link on the row of the NPC in the spreadsheet..
A couple of caveats:
1. You can go ahead and delete the first NPC record (without the link) - there's no easy way to go back and edit it so that the update link will appear. To do that, just right-click on the row number and select "Delete row".
2. If you edit the spreadsheet directly, those changes do NOT flow to the form or vice versa. You have to use the form to make edits. This is a limitation that I'm OK with, but keep that in mind.
Now, if you're like me, you'll probably think of a couple of other fields you might want to add that you want to track. Fortunately, with the form, you can do that.
Just remember - you have to make changes through the form. You can safely, add, edit, reorder the fields on the form. You'll see added fields back on the spreadsheet. Deleted fields or reordered fields won't make changes to the spreadsheet. You'll have to do that in the spreadsheet itself if you want.
You can also "hide" the Timestamp column. I did and everything still works OK. It just looks nice and the "Update" links are the left-most column.
I hope you'll give this a try and let me know what you think!

Last year, I made mention of a NPC database that I wrote in Microsoft Access that would allow me to not only track the various NPCs, but also automate the generation of "events" that would affect the NPCs.

I've tried Obsidian Portal's NPC/Character tool. I tried using a homebrew Microsoft Access database solution. But neither really met my needs for something that was simple as a Rolodex of note cards.
Enter Google - specifically, using Google Sheets and Google Forms. It's not a perfect solution, but given that I use Google Docs extensively already for my campaign, it fits into the flow. And it is simple like the note cards!
This tutorial is going to show you how I did this - maybe you'll like it! It's pretty simple to set up, and aside from a couple of restrictions, I see a lot of possibilities! I hope you'll try it out and let me know what you think.
1. Go to Google Drive and create a spreadsheet (Google Sheet).
(If you don't have a Google Drive account, it's pretty easy to set up.)
2. With the spreadsheet open, rename it to what you want to call your file. I called mine "NPC/PC Card File".
3. Now click on the Tools menu and choose the "Create a Form" option. A new tab will pop up in your browser with a Form created that has the same title.

4. Now you're going to create your card file fields. I wanted to keep this simple, so for now, I'm creating three fields - Name, Location and Notes. I want Notes to give me lots of room for free form text, but the other fields don't have to be too large.
5. For your first field, change the title to "Name" and the type to "Short Answer".

6. For the second field, click the "+" to the right of the form. In the new question, change the title to "Location" and the type to "Short Answer".
7. For the third field, click the "+" again. This question's title is "Notes" and the type is "Paragraph". This allows you to type in a lot more information.
NOTE: Before you close this form editor tab, see the URL in the browser address bar? Go ahead and select that and copy it somewhere, maybe to a Notepad or a document somewhere. You're going to need this URL in a minute.
8. Close the Edit Form tab and switch back to the spreadsheet. You will see that a new tab has been added to your spreadsheet, called "Form Responses 1". Go ahead and click on that tab and you'll see three columns named after the form fields you've created, plus a column called "Timestamp".
9. To test this out, refresh the page. Click the Form menu and select "Go to live form." A new tab will open with the form you just created! You'll be able to fill out your note card and submit it.

10. Go ahead and do so, then come back to the spreadsheet. If the entries aren't already there, they will appear in a few minutes as Google updates the response. Viola! You have created and tested your new card file.

Now this is pretty cool, but there are some immediate limitations. How can you go back and update existing cards? Can you modify the form to add additional fields, if you want? Can you modify the order of things, both on the form and spreadsheet? How can you use the data?
So I'll cover a couple of these right now. And another blog post to cover how to use the data.
You can go back and update existing cards... but it requires a bit of additional work to set that up. It's not quite as easy as just updating the spreadsheet itself.
Google allows people to go back and edit/update form responses, but they don't make it easy. You can't just modify the data in the spreadsheet. For whatever reason, Google has the responses stored elsewhere and uses that as the source of truth, even though you can see the responses in the sheet.
To do this in a simple way, we have to use some scripting that will automatically add a link to each row that allows you to click it and come back to the form to update the note card!
If you are familiar with programming, this will not be too difficult. If you are completely unfamiliar with coding, you can copy and paste all this and follow step-by-step to get you to where you need to be.
11. Insert a column between the Timestamp and Name columns. Title it "Update".
12. Click on the Tools menu and select "Script Editor". A new tab will open in your browser to a screen that looks like what you see in step 13.

13. On the right side is the editor area.

There's some code already there. Select all of that and delete it. Then copy what is below and paste it into the editor area.
var formURL = 'https://docs.google.com/forms/d/FORMID/viewform';
var sheetName = 'Form Responses 1';
var columnIndex = 2 ;
function getEditResponseUrls() {Once you've pasted this, you have one thing to change. Remember that URL we saved earlier in step 7? It probably looks something like this:
var sheet = SpreadsheetApp.getActiveSpreadsheet().getSheetByName(sheetName);
var data = sheet.getDataRange().getValues();
var form = FormApp.openByUrl(formURL);
for(var i = 2; i < data.length; i++) {
if (data[i][0] != '' && data[i][columnIndex-1] == '') {
var timestamp = data[i][0];
var formSubmitted = form.getResponses(timestamp);
if (formSubmitted.length < 1) continue;
var editResponseUrl = '=HYPERLINK("' + formSubmitted[0].getEditResponseUrl() + '","Update")'
// var editResponseUrl = formSubmitted[0].getEditResponseUrl()
sheet.getRange(i+1, columnIndex).setValue(editResponseUrl);
}
}
}
https://docs.google.com/forms/d/9abcb8NrHyezqnZ0q4IYfrGKo3KGn5vc_3b5FA3KDZxI/edit
The part of the URL in my example that is bolded/italicized is a form ID. It's between the slashes. You have to copy that form ID and in the code you just pasted, line #1, there's some text that says FORMID - replace that bit with the form ID.
So you go from this:
var formURL = 'https://docs.google.com/forms/d/FORMID/viewform';
To this:
var formURL = 'https://docs.google.com/forms/d/9abcb8NrHyezqnZ0q4IYfrGKo3KGn5vc_3b5FA3KDZxI/viewform';
(or whatever your form ID is... it's going to be different).
14. Click the File menu and choose the "Save" option. You will be asked to give a name to the project. I called mine by the same name as the spreadsheet/form: "NPC/PC Card File". Click the OK button with the new name and now the code is saved.
15. Now this next bit is a pain the rear. What we need to do now is to set up the function so that it can be used by the form and spreadsheet.
These next steps are what I had to do using Chrome as my browser. I don't know if you'll get the exact same thing in another browser, but hopefully something similar.
a. Click the Run menu, select the "Run Function" option and select "getEditResponseUrls". You should see a message pop up with something like below.

b. Now comes the weird part. Click "Review Permissions". A new browser window will open up and ask you to sign into your Google account.
c. Once you do, you'll get this big ugly message! Google tries to help people with security and warns them when they're doing risky things. Because you're probably not a verified developer through Google's services, you'll see this. But don't worry, we can continue!
d. Click the "Advanced" link. The warning window will expand a bit (you might have to scroll down). Now, click the "Go to NPC/PC Card File (unsafe)."
e. You will see a permissions window letting you know that this script will edit your spreadsheet (which we want, so we can can edit the data) and it will view/manage your form (which we want so we can show the form.). Click "Allow".

f. The window will close. You might see some quick updates as the function runs.. but nothing happens. That's OK! We're almost done!
16. We have to make it so that this script runs when you submit the form. To do that, we have to create a "trigger".
a. From the script tab, click the Edit menu and select the "Current Project's Triggers" option. A new tab will open up.

b. This new tab has a lot in it, but what you want to do is click the "create a new trigger" link or the "Add Trigger" button.

c. A form will pop up. Select "getEditResponseUrls" for function. Select "On form submit" for event type. The other fields should say "Head" and "From Spreadsheet". If not, make sure your form looks like below. Click "Save". It may take a few minutes, but you'll come back to the triggers tab and you'll see your new trigger.

17. OK, we are done with all the hard stuff! You can close the triggers tab and script tab. Go back to the spreadsheet. Click the Form menu and select "Edit form". A new tab will open with the form in it.
18. To the right on the form tab is a gear. Click it and you should see the Settings. Check the "Edit after submit" option and click save.

19. Now let's test this out! On the spreadsheet tab, click the Form menu and select "Go to live form" option. On the form, enter a new NPC and submit it. When you click back to the spreadsheet tab, you should see the following:

20. You should see the underlined "Update" link, click it - and you'll be able to go back and edit that NPC's card.
OK, now you have something useful! You can create and edit NPC cards. Just by using this spreadsheet and the attached form.
To add a new NPC record - just click Form/Go to live form menu, from the spreadsheet.
To edit an existing NPC record - just click the "Update" link on the row of the NPC in the spreadsheet..
A couple of caveats:
1. You can go ahead and delete the first NPC record (without the link) - there's no easy way to go back and edit it so that the update link will appear. To do that, just right-click on the row number and select "Delete row".
2. If you edit the spreadsheet directly, those changes do NOT flow to the form or vice versa. You have to use the form to make edits. This is a limitation that I'm OK with, but keep that in mind.
Now, if you're like me, you'll probably think of a couple of other fields you might want to add that you want to track. Fortunately, with the form, you can do that.
Just remember - you have to make changes through the form. You can safely, add, edit, reorder the fields on the form. You'll see added fields back on the spreadsheet. Deleted fields or reordered fields won't make changes to the spreadsheet. You'll have to do that in the spreadsheet itself if you want.
You can also "hide" the Timestamp column. I did and everything still works OK. It just looks nice and the "Update" links are the left-most column.
I hope you'll give this a try and let me know what you think!